thegogreenspot

Let us be good stewards of the world that God has given us

Roadside Litter Pick-up With a Goal of Recycling April 7, 2013

Filed under: Recycling — lizdwyer2013 @ 7:50 pm
Tags: , ,
Carl on his first litter pickup.

Carl on his first litter pickup.

Lately when I had been driving to and from work, it was getting harder and harder not to notice the huge amount of litter covering the roadsides, most of it recyclable. So I read online that our county offered free litter pickup supplies at the Planning and Zoning department.

When I dropped by, they were very helpful and offered all kinds of free supplies to get the work done: large plastic bags, ‘gopher’ gripper sticks (I have no idea what they’re actually called), durable work gloves, orange safety vests (we already had orange shirts), and even reusable ‘go green’ tote bags (to use at the grocery store). Everything was free, all they asked in return was that we let them know how many bags we filled up. This is so they can report these figures and get more supplies. They get these supplies from grant money from the county government.

Check with your own county government, and I guarantee they will have free supplies for you as well.

So today my husband Carl and I went out to do our first litter pick-up on one of our heavily-littered county roads.  Neither of us was sure what to expect, because we had never done anything like this before. Even though it was a lot of work, it actually turned out pretty good.

We found a good spot to pull off, and just started going down one side of the road. We filled two extra-large bags after going a quarter-mile on one side of the road, and then crossed over and started down the other side. In all, we filled 4 extra-large bags and went on both sides of a quarter-mile stretch of road.

It was mind-boggling to think of the amount of litter out there, since we had collected so much in such a short distance. But we are not daunted, and plan to carry on doing our part in cleaning up litter. Hopefully at some point, we can organize more people to help out.

I plan to weed through the litter and pick out the recyclables to take to our local recycling center. Next time, I think it would be better to separate the recyclables as we’re picking up litter, that would save a lot of time.

Update 4/13/2013 : I have gone through about half of the litter, and so far have filled up two giant bags of recycling. It seems that most roadside litter is eligible for recycling. I’m planning another litter pick-up operation soon…

litter-pickup2

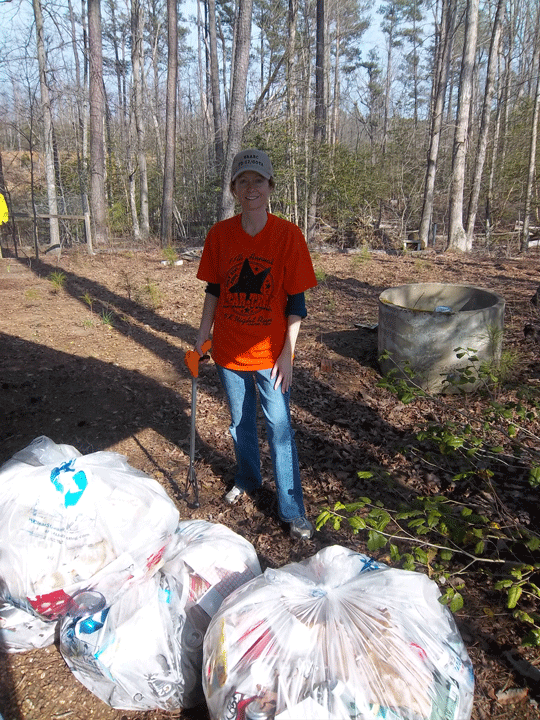
Me on my first litter pickup – I still have to go through it and sort the recycling out.


DIY Soda Can Solar Heater April 2, 2013

Filed under: Recycling,Solar — lizdwyer2013 @ 12:51 am
Tags: , , ,

My husband Carl built a solar-powered heater with soda cans and materials that we had around the house. Our house is smaller, 1200 sq ft, and with the solar heater installed in one of our living room windows and attached to a fan blower inside the house,  it prevents our heat pump from coming on all day on cold days when the sun is out.

0228131422b

Our solar heater built out of soda cans and materials we had around the house.

How It Works

He put an input hole into the box which allows cooler air from the house to be drawn in and heated as it passes through the cans which have been heated by the sun. The warmer air exits the box and is used to heat the house. (We have a tube coming from the exit hole connected to a fan blower inside the house to cycle air through the box.)

How He Built It

We happened to have 2 old windows to use as the covering for the box, and the size of the heater box was based on the size of the windows. Our heater box is 34″ X 54″. If you want to do this yourself, you could also use a clear corrugated material, or any kind of clear material that lets the sun come in.

Phase 1: He made a 34″ X 54″ basic frame out of a sheet of plywood and 2X4s . He cut two  holes in the frame for intake / outtake. Then he cut a coffee can in half and glued them in place.

0228131200a

Phase 1: Wooden frame, 34″ X 54″, with coffee cans in place.

Phase 2: We collected 108+ soda cans! (Yes we drank a lot of soda, and had other people donate them.) We washed out the soda cans and let them dry.

Collected cans with lids removed and slits cut into bottoms

Phase 2: Collect soda cans, make slits in bottoms, and use can opener to remove lids.

Now came the hard part, putting the holes in the botttoms of the soda cans. He used a rotary tool with a cut-off bit to make an X pattern. His bit got worn down, and there’s probably a better way to do it, but that’s what he had on hand. He used the handle-end of a screwdriver the open the whole from the cut X-pattern. Then he used a hand-crank can opener to remove the tops of the soda cans.  This worked rather well.

Phase 3:
Next, to secure the cans for the top and bottom, he cut holes in two pieces of foam board so that the tops of the cans fit snugly into the holes.

0228131422

Phase 3: Top and bottom rows of cans fit into holes made in foam board. The ‘lid’ end of the cans inserted into holes.

0228131422a

Phase 3: Top and bottom rows of cans fit into holes made in foam board. The ‘lid’ end of the cans inserted into holes.

Keep in mind that the heat generated inside the finished box might reach temperatures of over 120 Deg, and in our case we had a small area of the foam which melted.

So if you have other materials that you can use in place of the foam board that can withstand more heat, that would be better. (Ours had just a small amount of damage, and is still doing fine.)

Phase 4: He dry-fit the cans into the middle of the frame, with the cans in the same direction for ease-of-fit. However, the bottom row of cans have their tops fitting into the foam board facing down. He left an even gap at both ends of the frame for air circulation, between the foam board and frame. Next he sealed the bottom gap using a solid piece of foam board. (Do not seal the top end with foam board yet – although next photo shows it sealed.)

Phase 4

Phase 4 – Dry-fitting the cans, leaving gaps at both end of frame, sealing bottom of frame with solid foamboard

Phase 5: Then he started gluing the cans to the back of board and also gluing cans together to make a seal between them. He used Liquid Nails adhesive.

Phase 5: Cans glued onto the frame.

Phase 5: Cans glued onto the frame, and glued together to create a seal between them.

Phase 6:  Placed a piece of foam between intake and outtake to separate the airflow. This is a VERY important step in the overall functionality of the heater. (*Not shown in the picture: Another solid piece of foam board placed over this top-gap)

Intake Baffle

Intake Baffle

Phase 7: He painted the cans and foam board with a matte black spray paint.

Spray-Painted Cans

Spray-Painted Cans

Phase 8: He put a bead of liquid Nails all the way around the frame and screwed the windows to the frame. Then the window frames and entire unit was painted with an outdoor black latex paint.

0301131320

0301131446It was a lot of hard work but it was a lot of fun to build and is showing some great results. If you have any questions, my husband Carl will be happy to answer. He is on this blog as well.

AND THE WORKING FINISHED PRODUCT…

Finished Solar Heater

Finished Solar Heater